Tuesday, August 16, 2016

An New Blog for A New Crafting Artform - IdeaRoom3D

If you are/were a follower of this blog, you know how much respect I have for the crafting community.  You also know of my passion for 3D design and printing.  From the day I began to blog about 3D printing I fully anticipated that someday the craft and 3D printing world would find that tipping point where they converged.

I think that time has finally come.

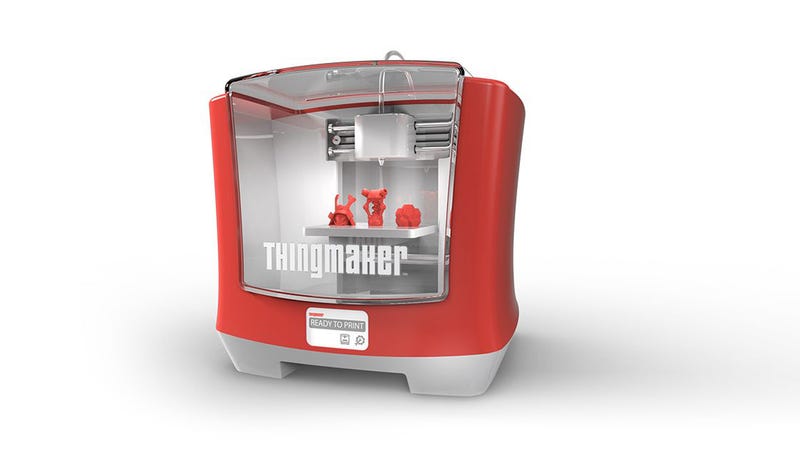
What was needed was a low cost 3D printer that could produce prints in materials that were well suited for crafting and some way to colorize and beautify the prints.  The low-cost 3D printer has arrived in the form of the M3D Micro, which can print in a variety of materials, including flexible "Tough 3D Ink" in a variety of colors... including clear!   With flexible materials we can create personalized bracelets, designer barrettes, custom pins and faces for stuffed animals!  It's a wonderful new material.

M3D Micro 3D Printer


And, a way to bring the prints to life with full color has arrived with the Craftwell eBrush  airbrush system!


Craftwell's eBrush Airbrush System

I have tested the eBrush with M3D's flexible materials and with their ABS-R.  I am certain it will also work well with PLA.

I have started a new blog that will be devoted to exploring the M3D line of printers with an emphasis on creating crafts.  And, I'm very happy to be blogging about Craftwell products again. 

The new blog is called "IdeaRoom3D".

 The reason behind that name, is my belief, from years of experience in 3D printing, that ANY room can become an "Idea Room" with the presence of a 3D printer.  There is something about having the ability to turn abstract ideas into physical reality in 3D form that unleashes creativity in a very dynamic and powerful way. 

Want to ask you to join me in my new IdeaRoom3D blog to see if 3D printing is in your future.  The crafting community is THE most creative community that I know.  But, it's more than that.  It's also a wonderful loving community because that is why you do what you do.

I expect that a lot of groundwork needs to be done before most of you will be ready to invest in a 3D printer.  So, be patient with me as I explore how to create appealing items that enhance your current creative work.  Designing in 3D is certainly one hurdle.  But, I have found a site that can turn our familiar SVG files into 3D objects and, believe it or not, I find using my favorite 3D design application even easier to use than Inkscape.

Going from 2D art to 3D art is a journey that we can take a step at a time.  And, i can assure you it's going to be a LOT of fun!

      Tom

Saturday, February 20, 2016

My Recommendation for an Excellent Camera to Shoot Our Works

Believe it or not, my first foray into the world of crafts around 2000.  My participation in the Craft Report (now Handmade Business) forums  was posting about how craft artists could use digital cameras to shoot their own work.  To say that I met with resistance from professional photographers on the forum is a monumental understatement.  It was just plain vicious.

But, in time, more and more artists and craftsperson have found they they can, in fact, effectively shoot images of their own work.

The question isn't whether it CAN be done; but, what is the best equipment and technique that can allow us to do so easily and effectively.

I have always been uneasy about recommending cameras for those wishing to shoot their own work.   The range of cameras is SO wide and the means of individuals is so critical to the choice of a camera that I just didn't feel comfortable recommending a particular camera.... until now.

Some Background

While I had spend years as a videographer, I moved into digital photography around 2000 to help my daughter by shooting her ceramic sculptures.

Fleurette: Sculpture by Cheryl Meeks photo Fleurette01.jpg
Fleurette by Cheryl Meeks - Carved Porcelain

I have always used high level DSLR or SLR digital cameras.  These cameras have cost at least $1,500+ and the camera+lens combination (Canon 5D MK II with 24-70 f2.8L and 70-200 f2.8L lenses) that I have used for the last 3 years exceeds $7,000.  This is hardly affordable for most artists and craftspersons.   Moreover, SLRs, oddly enough, with their large image chips and shalloe depth of field, might be LESS effective for shooting small objects for pacing images on Etsy or eBay.

On the other hand, on the low end, point & shoot cameras, the problem is how to control the lighting to present our work in the best light possible. 

My daughter recently began creating ceramic marbles and wanted to photograph them herself.  She was not at all interested in a complex SLR so I began to serious look at the options.   Her new interest coincided with my interest in finding a smaller and lighter camera for myself for my blogging and teaching as the Canon 5D is quite heavy.

This lead me to so-called "bridge cameras".   We first turned to the Nikon L840.  She likes it.  I hate it.  The appeal for her is how easy it is to use.  But, its lack of a hot shoe for a flash has required me to come up with less-than-ideal lighting strategies for her to use.  We're still working on that.

But, in the meantime, I knew that the L840 would drive me crazy.  Interestingly, my solution came about through my long-time interest in video.  I use a Panasonic x920 and had subscribed to a blog by Graham Houghton to follow his articles about that video camera.  Along the way, he also wrote about a Panasonic Lumix still camera called the Lumix DMC-FZ200.

I took a chance and ordered one.   I could not be happier.

I have come to believe that if an artist or crafts person does not already have an SLR camera, then the Panasonic Lumix FZ200 is an infinitely better choice as at $247 (B& H Photo) it is probably THE greatest bargain in a still camera that I have ever seen.  The price/performance ratio is astounding.

Panasonic Lumix FZ200 Digital Camera

 It offers the ease and simplicity of a point & shoot with extended capabilities normally found on professional SLRs... like a hot-shoe and f2.8 lens.   From now on it is the Lumix FZ200 that that will be my go-to camera for shooting my 3D objects and images for my blogs.  

So, the question is this.  Are you interested in shooting your own work?  If so, are you interested in learning how to use a camera like the FZ200 to do so?  Your comments will determine whether or not we go down this path.  We will cover low cost lighting solutions for smaller (Under 12"x12"x12") objects and the use of auxiliary lenses for shooting high detail or very small objects.

Let me know.  :)

For Craft Artists the Sands are Always Shiftimg.... POSITIVELY!

As I look back over the last 14 years, since I first started blogging about crafts, I am amazing at how far the landscape has shifted.  The offerings of products have not only changed; but, the variety of new methods for reaching our design goals have vastly increased.

But, sometimes, the biggest changes are in ourselves as our interests expand or compress over time.  I finally gave my paper cutters to a charitable organization after seeing them sit idly for a number of years as my attention was turned to 3D design and printing.

But, even in that endeavor, today is a lot different than it was just 3 years ago when I obtained my first 3D printer.  I started with a kit and was overjoyed when 3D Systems introduced the first true consumer 3D printer, the 1st Generation Cube.  Now, 3 generations of the Cube have come and gone and 3D Systems has announced they are leaving the consumer marketplace.

There is a reason for that.  So many new companies have introduced 3D printers with ever lower price points that in just a few short years the profit margins on 3D printers are under a great deal of stress.

The good news is that this plethora of options among 3D printers means they are more affordable than ever.

The other good news is that companies like Autodesk are committed to making 3D design easier and easier.  Believe me, if you can create SVG files for cutting, you can easily learn ro create your own 3D designs.  In fact, I actually find it EASIER to design in 3D than in 2D.

The reason for my writing this particular post is to alert you to a new 3D printer offering that just might be the tipping point for home 3D printing.

It actually comes from the TOY industry!

I have no idea how well it works; but, at $300 (List) it certainly begins to be an appealing product for parents and families.  It's from Mattel and is called The ThingMaker.

Mattel Is Making a $300 3D Printing Toy Studio For Kids

I don't do cut and paste articles so until I can get some real experience with the Thingmaker, I will not offer and opinion of its viability.  But, I did want you to know about it so you can be aware that the sands are shifting in YOUR direction!  :)

Wednesday, September 11, 2013

Paper and 3D Printing Move Closer Together

If I learned anything from the paper crafting community is that creativity, love and making people feel special is what this community is all about.   I love what you do and I love what you do for those you care about.

As a teacher, it broke my heart to see children that didn't have parents like you, that take the time to let their children know how special they were.  Now that I am back into teaching "at-risk" kids 3D printing, I see how important it is to these kids to create something that they can give to their caregivers to make them proud of them.

When I first posted in this blog about 3D printing, the means to create a 3D object for printing were largely technical in nature, based on CAD style drawing.  But, 3D Systems has now released Sculpt, a virtual clay sculpting application that is much simpler to use than previous sculpting applications that I've tried.

The more I use Cubify Sculpt and 3D printing, the more I am convinced that the very passion and skills you now use to create your paper crafts are perfectly in line with those skills that can create designs that bring that same passion and love in a new format that enhances your current work.

Expect to see this blog come to life again with tutorials and articles expressly designed to demonstrate my belief that you have not only the skills to create 3D objects; but, that these objects can enhance you REAL goal... which is to express the feelings that you have for those around you!

I love the paper crafting community!!! :)

Thursday, March 8, 2012

The eCraft tearing problems revisited

I have watched from the sidelines as the tearing problems persist. 

Yes, there are work arounds.  And, at least some of the problems deal with cutting points that have dulled.  But, the majority of problems are related to a behaviour in the eCraft that causes the paper to be lifted up by the cutter until it is above the cutting edge of the blade.

I know this because I spent a considerable amount of time observing tearing using a high-speed camera to catch the action in slow motion.  And, I sent these videos to eCraft for their engineers to study.  I didn't say anything because I felt a team that could come up with such a wonderful design in all other respects would figure out how to stop the paper lift.   I wanted to give them the time necessary to do so.

Here is a slow motion video that demonstrates exactly what is happening just before your paper rips.   Notice how the blade lifts the paper!


As ripping still seems to be an issue, I am going to do my best to used what I learned in that research to try to see if I can come up with a solution.  All I can do is to promise to try.  And, at long last, I think I have the means to do so, now that I own a 3D Printer with which to experiment.

One of my goals with my new 3D printer is to come up with a solution to the tearing problems if at all possible.  I'm going to attempt to design a foot that holds the paper down as the eCraft cuts, much like the foot on a sewing machine.  I will let you know if the idea works!

Wish me luck for ALL of us!

Tuesday, March 6, 2012

Show me the love!

And, I'll show you a CONTEST!

One of my greatest experiences has been becoming acquainted with the craft community through my early blogs about the eCraft cutter.  What I came away with out of that experience is that this community does what it does out of a deep love of family, friends and creativity.

I FINALLY found a fun way to give something back to at least a few of the fantastic followers of this blog.  I wish I had enough money to send something to everyone.  But, I don't.  However, I CAN recognize the work of every one of my followers.

Here is what I'd like you to do.
  1. Add your name as a follower, if it's not already there.
  2. If you have a blog, photo site, Facebook page, Twitter account or other social media where you have images of your work, I would like you to send those links to me by March 15th, 2012.
My email for this is:   tmeeks[at sign]createandcut.com.

I will moderate the links to make sure they are family friendly.  Those that pass that test will be featured in a future article on how the heart plays such a huge roll in the craft community.

My gift also has a second goal.  I think people who love crafts and family will love 3D printing.  So, I'm hoping this contest will introduce all of you to the potential of 3D printing to expand the ways you create to show love.  One of the best ways to become acquainted with 3D printing is to create something and have it created by a 3D printer.  And, right now, among the most fun and best 3D experiences that my granddaughters and I have had was when we created some robots together,

Here is a video of the robot building process created during the MyRobotNation's beta test.


I've ordered 5 gift certificates from My Robot Nation to be given away through this blog.

The first My Robot Nation certificate will be going to a person that I REALLY appreciate enormously.  When events took me out of eCraft blogging, she more than picked up the slack.  And, I know that many, many of you have been helped by her.  So, our first recipient will be Denise O'Connor of Purple Paper Paradise.  I can hardly wait to see her first robot creation.

Don't tell her... It's a surprise!!!  :)

I will then pick 4 additional followers at random, from those that have sent me links, and send the 4 winners a certificate that allows them to create and ship a robot from MyRobotNation.com.   If a winner is outside the U.S.A., I will have to add funds to your gift certificate for the shipping.  So, I will contact each winner to try to ensure that you pay no shipping costs.

This is the first time I've tried something like this.  So, I hope that my rules are clear and all goes well.  This is meant to be a fun thing for everyone.   And, that is where the 3rd rule comes in.  When you have created your robot, we'd like to see it and hear how your first 3D experience went.

In the meantime, have fun with this short video!


I don't work for MyRobotNation.  Nor do I have any ownership stake.  It's just my kind of fun!

Sunday, February 19, 2012

A great Example of 3D Printing and PopPop/Grandchildren Quality Time!

3D Printing has been around for a while for businesses.  These days, some shoe manufacturers won't manufacture a line of shoes until they've have shown the buyers of the bigger stores that shoe in a 3D model.  Here are two views of a sample that I saw on my visit to the 3D Systems headquarters.


Even standing right next to them, they appear to be made of leather with rubber soles.  It isn't until you pick one up that you realize this a 3D print.  They look that real.  It's very cool.

Now, that same technology is beginning to be available for consumers.  3D Systems will be selling a home 3D Printer that does single color printing.  But, they will also be offering the ability to print with the very same technology that created the shoes.  They've dubbed this "Printing in the Cloud".  You design the object you want printed.  Upload it to the 3D Systems "Cloud".  They print it and send it out to you.  This means 3D printing in a wide range of materials and unlimited colors.

But, we don't have to wait until 3D System's Cloud is fully functioning to experience what it will be like.  My Robot Nation premiered late last year.  I can tell you from experience that this is one fun web site with a great user experience from start to finish.  My granddaughters and I did the whole My Robot Nation experience together.  It was a collaborative effort.  I supplied the credit card and they supplied the designs!

It was amazing to see how easy and fun it was to design each robot.  The online user interface is excellent and very well organized.  You get to chose the parts for your robot and then color each part.  They even wrote their names on the back of their respective robots for a real customizing experience.

Once the order was placed, a series of emails tracked the progress of the robots through manufacturing and shipping.  But, it was just the fact that they communicated.  It was the enthusiastic wording that made me love their attitude toward their customers.  Each email extolled the awesomeness of that particular robot and they sent an image of the robot right out of the printer before shipping.

I think we enjoyed the emails as much as we enjoyed making them! 

Amazingly, the robots arrived in just 7 days.  We had ordered them on a Saturday and they arrived the following Friday.  Here they are in all their AWESOMENESS!!


My granddaughters have names that are NEVER on the cups, etc. in gift shops or toy stores.  But, this time they WERE able to buy an item having their name on it.  That is because they were able to do it themselves!


These robots were printed with the exact same materials and methods that create the shoes above.   By the way, some people actually created robots as cake toppers for their wedding!  While I think that's kind of cool, I don't think my wife would have been quite so thrilled with that idea.  But, it won't be long before we can create things like these with our own images and then I think she would see the value in that.  It's only going to get better!